Making Doughnuts at Home!
I really enjoy doughnuts. When I was a kid and I went ice skating with my 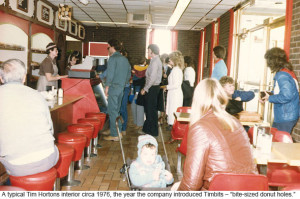 dad, we would stop at Tim Hortons on the way home and sit at the counter (back then there was a counter, kinda like a diner) and we would have hot chocolate and doughnuts. It was just the two of us. No brothers allowed. I liked that.
Once in Tenessee on vacation my family was at a water park. When we were finished we went to the doughnut shop next door. I must have been funny or charming, or maybe I just looked like a drowned rat, but the lovely lady behind the counter poured extra chocolate glaze on my chocolate dip doughnut. That was a good day.
Also, we had a cottage on Lake Couchiching when I was a kid. Before we left home on a Friday night to make the 2 hour drive we would stop and buy a dozen doughnuts, but none of us were allowed to even look at them until we reached the Holland Marsh (an agricultural area about 40 min north of Toronto). As soon as we were passing the marsh, the box of doughnuts came out and everybody picked their favourite. To this day, whenever I drive past the Holland Marsh, I think about doughnuts.
Doughnuts always seemed like something you had to get from a store. They aren’t baked, they are fried. And they are filled with jam and/or iced with a special shiny glaze. I can’t make that at home! Right? No. Wrong.
The other day a friend posted this picture on facebook and asked what this device was and wondered if he needed it. I knew immediately what it was, and my pulse quickened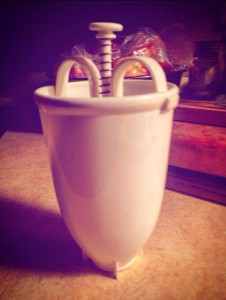 with excitement. It was a doughnut dropper! I told him he absolutely needed it and it was a sign that he needed to start making doughnuts at home. I told him I would help him by giving him a few recipes and then I thought that maybe everyone has a doughnut dropper hidden in their kitchen somewhere. I can save the world…one doughnut at a time.
I made my first doughnut about 4 years ago. I don’t make them often, but I make a bunch when I do. My first attempt was a gluten free potato doughnut and it was actually pretty awesome. I’m including a few of my favourite recipes here for your doughnut making pleasure.
A few words of advice before you try making doughnuts at home. You don’t require an actual deep fryer. You can use a big pot and a lot of oil. That said, do your research (google) on how much oil to put in the pot and get yourself a candy thermometer so you can monitor the temp. If you have access to an actual deep fryer, it is a little more user friendly. Also, open your windows and turn on your hood fan. Deep frying can be a little fragrant.
Also, remember the best thing about deep frying is that once you’ve made your doughnuts, you are all set up to fry chicken, or fish, or tofu, or tempura veggies and shrimp. Make onion rings! Make zeppole! Make french fries! Your house already stinks, and what else are you going to do with that oil? Just remember to do your doughnuts before you start with the fish. Unless fish doughnuts is your thing.
Happy doughnut making! If you give it a try, send me a pic! (through comments, facebook, or instagram!)
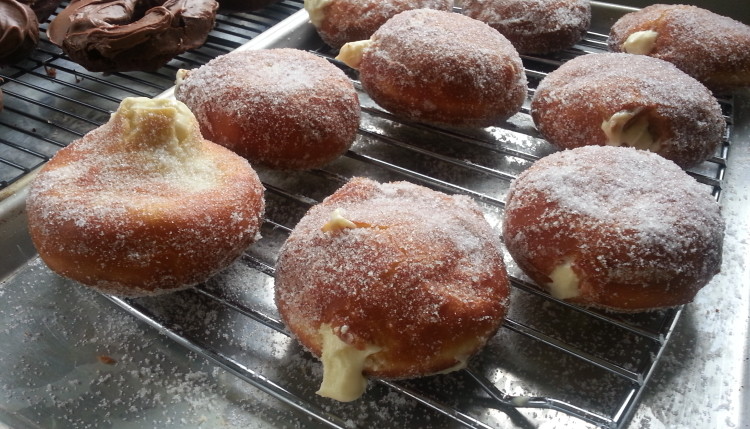
Vanilla Cream-Filled Doughnuts (Joanne Chang / Flour Bakery)

Basic Devil’s Food Cake Doughnuts (Top Pot Hand-Forged Doughnuts)

| Servings |
| lots |
|
|
|
|
This recipe is from Hand-Forged Doughnuts by Mark and Michael Klebeck with Jess Thompson from Top Pot Doughnuts. Thom and I always debate which is better, cake doughnuts or yeast doughnuts. To me, a cake doughnut wins every time.
|
- 2 cups (225g) cake and pastry flour plus more for rolling and cutting
- 1/2 cup (50g) unsweetened Dutch processed cocoa powder
- 1 tsp baking powder
- 1 tsp salt
- 3/4 tsp nutmeg
- 1/2 cup (100g) sugar
- 2 tbsp vegetable shortening
- 2 large egg yolks
- 1 tsp vanilla extract
- 2/3 cup (165ml) whole milk
- Canola Oil for frying
- 4 1/2 cups (450g) icing sugar
- 1 1/2 tsp light corn syrup
- 1/4 tsp salt
- 1/4 tsp vanilla extract
- 1/3 cup (75ml) plus 2 tbsp hot water plus more if needed
- 2/3 cup (115g) semi-sweet chocolate (melted) chips or chopped
- Sift flour, cocoa powder, baking powder, salt, and nutmeg together in a medium bowl. Set aside.
- In a stand mixer fitted with the paddle attachment, mix the sugar and shortening for 1 minute on low speed, until sandy. Add the egg yolks one at a time, then mix for 1 more minute on medium speed, scraping down the bowl with a spatula as necessary, until the mixture is light coloured and thick. Mix in the vanilla.
- Add the dry ingredients to the wet ingredients in three separate additions, alternating with the milk, mixing until just combined on low speed each time. The dough will be sticky, like cookie dough.
- Transfer the dough to a clean bowl and refrigerate, covered with plastic wrap for 45 min (up to 24 hours).
- If using a deep fryer, preheat to 370º. If using a deep pot, add 2-3 inches of oil and with a candy thermometer, preheat to 370º.
- Roll out the chilled dough on a floured surface to 1/2 thickness. Flour the dough and rolling pin as necessary to prevent sticking.
- Cut as many doughnuts and holes as possible, dipping the cutter in flour each time to keep from sticking. Fold and gently re-roll the dough to get more doughnuts and holes.
- Shake or brush any excess flour from the doughnuts before adding them to the hot oil one at a time - being careful not to crowd them. Once the doughnuts float, fry for about 60 seconds per side - you won't be able to see when the doughnuts brown because of the chocolate, but you will see a change in texture. Drain on paper towels and cool.
- Place the icing sugar, corn syrup, salt, vanilla, and hot water in a large mixing bowl or in the bowl of a stand mixer fitted with a paddle attachment. Using a whisk or with the machine on low speed, blend until the mixture is smooth and all of the sugar has been incorporated, scraping down the sides of the bowl with a spatula as necessary. Add the melted chocolate and stir to combine completely. If the icing seems too thick, add more hot water, one teaspoon at a time.
- To ice the doughnuts, dip one side of each cooled doughnut into the warm icing, and let dry for 10 - 15 minutes before serving.
Gluten-Free Potato Doughnuts (Gem Bits/Wendy Turnbull)

| Servings |
| 3 dozen little doughnuts |
|
|
|
|
This recipe is from Wendy Turnbull's book "Gems of Gluten Free Baking." These were the first doughnuts I ever made. You can make little 'Timbits' or 'Doughnut Holes', or you can use a doughnut dropper and make full size doughnuts. Really tender and yummy.
|
- 2/3 cup brown rice flour
- 3 tbsp tapioca starch
- 2 tsp baking powder
- 1/4 tsp nutmeg
- 1/4 tsp salt
- 2/3 cup cooled, well-mashed, baked russett potato Baked russet potatoes are dry and starchy and are perfect for keeping doughnuts moist
- 1/3 cup sugar
- 2 tbsp water
- 1/4 tsp vanilla
- oil for deep frying Vegetable, canola, or any neutral tasting oil with a high smoke point is acceptable
- icing sugar or granulated sugar to coat doughnuts
- Bake the russet potatoes. Mash and cool
- If using a deep fryer, add oil and preheat to 350º. If using a deep pot with oil, add 2-3 inches of oil and insert a candy thermometer. Heat to 350º.
- Whisk together brown rice flour, tapioca starch, baking powder, nutmeg and salt and set aside
- In a mixing bowl combine mashed potato, sugar, water, egg, and vanilla. Beat until smooth.
- Blend dry ingredients into mashed potato mixture and beat until smooth
- Use a doughnut dropper for large doughnuts, or drop by tablespoonfuls into the hot oil and cook about 2 minutes, turning the doughnut over with a fork or bamboo skewer halfway through. (Large doughnuts may take a little longer)
- Cool on a rack lined with paper towel. Roll in icing sugar or granulated sugar
Amy • January 15, 2016